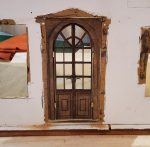
I just have not found the time to do much with my Walmer dollhouse rebuild lately, but I did make some design decisions. I designed an impressive new front door to replace the mass-produced version I was going to use. I think it will give it more of a European flair. I used pictures of full-sized split arch French style doors to create a pattern. Then I had fellow Etsy seller ShedtoshelfBySean produce it for me. I really like how it turned out.
After some staining, gluing with clear plastic sandwiched between the doors for windowpanes, hinges, fancy door handles and a lot of cutting and sanding to make it fit, I finally got the door that I want. I plan to build a small overhang above the door to create a portico and make it more inviting.
I also practiced my stonework technique and decided on stone and mortar colors. The “stone” is made from torn pieces of paper egg carton. The pieces I used for practice are larger than what I will use on the exterior walls of the dollhouse. I glued the pieces to a painted piece of cardboard. Then I tried various colors and techniques for the stone and mortar. I’ve decided to go with the one on the left in the picture below. It is a custom blended mortar color, FolkArt chalk paint in the shade of Sheepskin (ugh, I don’t like the name) with a very watered-down wash of Rust-oleum Chalked Smoked Glaze. The stones next to them have a wash of Chalked Aged Glaze, but I like the gray look of the smoked better. I will finish with a sealer, but I haven’t decided between Mod Podge matte or a matte artist spray sealer yet. I’ll have to do a test to see which looks better.
I will be much more careful with the mortar color when I do the finished product, I was just being sloppy with my test because I got tired of trying different colors.
The other decision I made was to use split cedar shakes for the roof. I’ve been hemming and hawing over that because I wanted to do a metal roof, but I just don’t have any experience with that and am not confident that it would turn out well. I’d rather go with an “aged” wood shingle look, because I have worked with that before. I wasn’t really sure if cedar shakes are usually done on a mansard roof, but I found out it is fairly common. I found this picture, which is most likely the look I would get, except I could apply a grey wash to age it:
Then I saw THIS, and it really makes me want to go with the fish scale shingles. It also makes me want to add the extra ridge at the bottom so that I can add corbels. And this is why my project is taking so long…
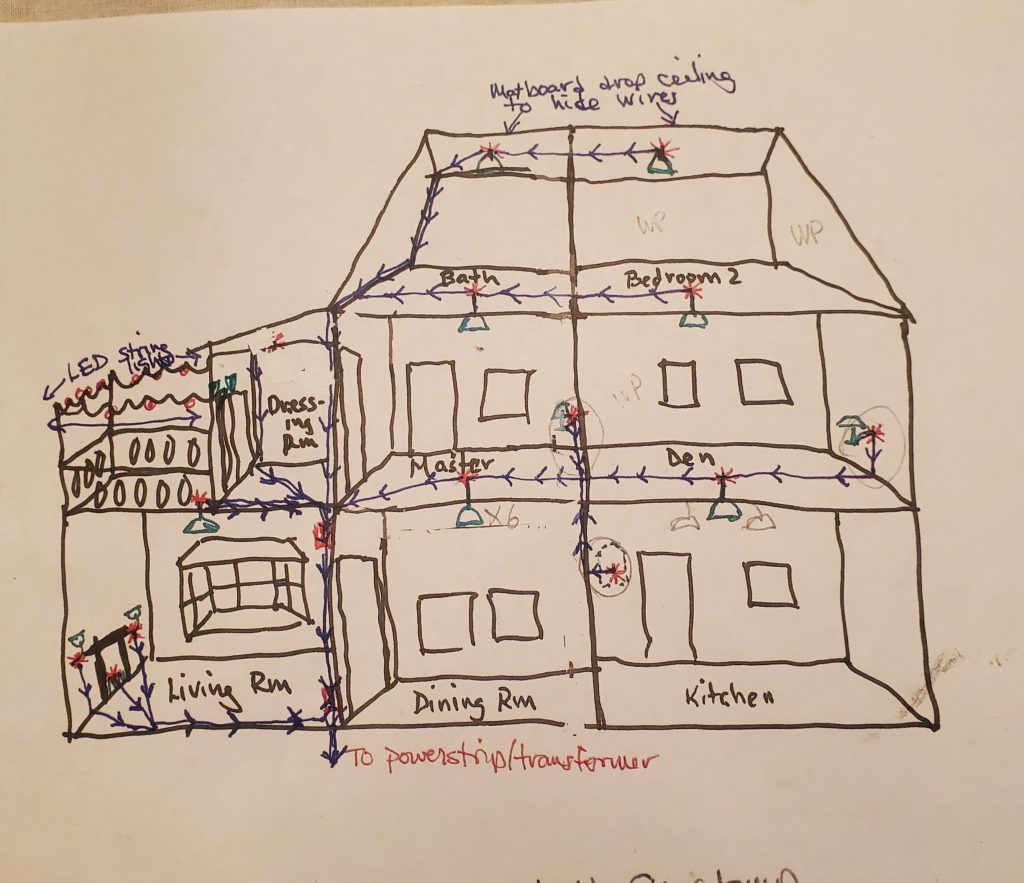
I really have to get busy with wiring, because it is holding up a lot of other processes. Below is my crazy wiring diagram, if you are interested. You can tell that I don’t have any hidden drawing talent. It probably only makes sense to me, because there is so much going on. The left addition will be wired separately from the right so the house can come apart. I want to make most of the light fixtures by hand. The red asterisks indicate where light fixtures will be. Most of the wires will be hidden by flooring or trim. I don’t want to use tape wire and with 3V LEDs I don’t have to. The wires needed are a very fine gauge so should be easy to hide.
More to come, but I can’t really promise soon – unless I win the lottery or something.
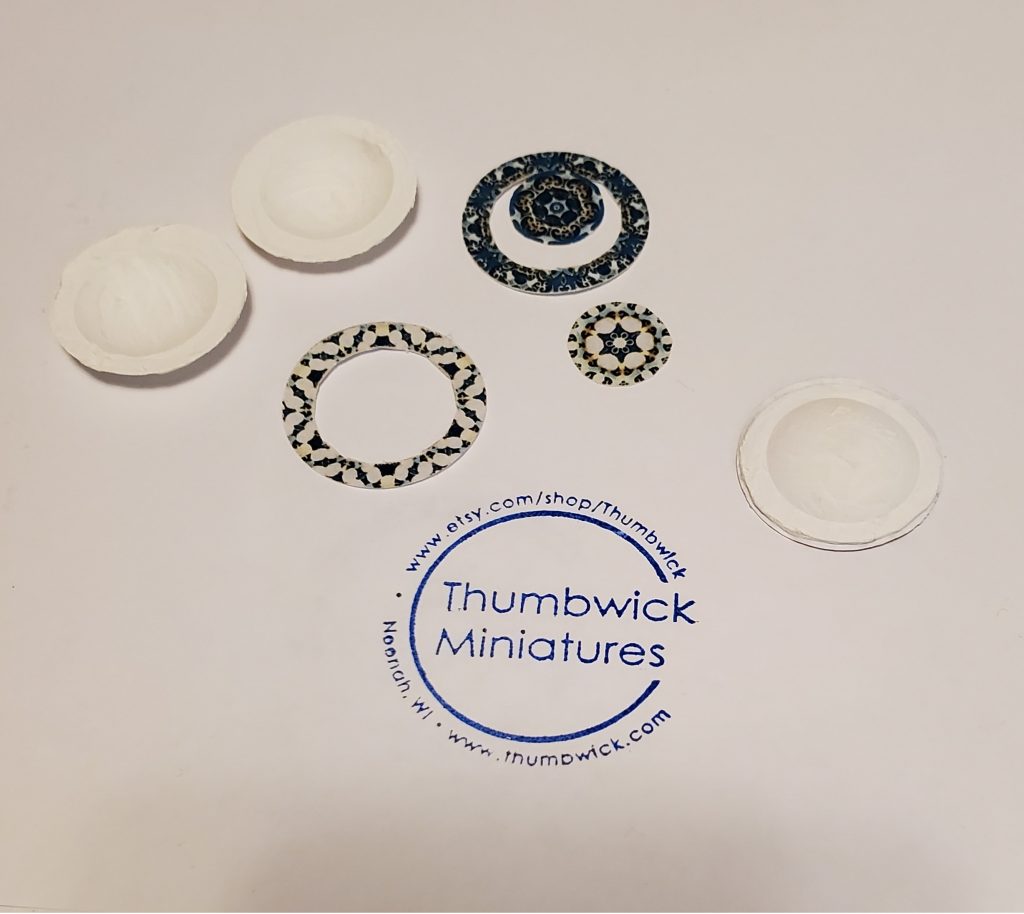
With a little effort and a few items, you can make these lovely porcelain-look bowls for your dollhouse. They will add such a realistic designer touch to a miniature China hutch, plate rail or dining room table.
What you will need:
Images of China plate patterns shrunk down to 1″ in diameter and printed on regular printer paper. The kind that has an outer boarder and center circle design with a band of white between them, not a pattern all-over
White or cream colored acrylic paint and a small paintbrush
Plastic ring tabs that are removed from a cardboard carton of coffee creamer or similar container
Sharp scissors for small detail work
Craft blade (optional)
White or tacky glue
Sandpaper or emery board
1″ & 3/4″ circle hole punches (optional, but nice to have)
Gloss mod podge or clear glaze
First you need to prep the plastic rings by cutting the “bowl” part away from the ring. Carefully use a craft blade if you don’t want to dull your good scissors. Cut as close to the rim of the bowl as you can and then sand smooth any remaining bump left. If your plastic doo-hickey is like mine, there may be raised numbers on the bottom but these won’t show when you are done. You can try to sand them down too if they bother you. Then set the bowl level on your sandpaper or emery board and sand a flat spot on the base, so you bowl will sit level.
Next paint your bowl white or cream (whichever looks best with the plate pattern you have chosen). Give it 2 – 3 coats on the bottom and top, letting dry on each side before turning to paint the other.
Now use your 3/4″ circle punch or scissors to carefully cut between the outer China plate pattern boarder and the center round pattern. Trim the center round pieces up to the pattern and set them aside for now. Use a 1″ circle punch to cut out the outer boarder patterns, or cut freehand with scissors, and trim the inner edge of the border up to the pattern. If you understood my explanation you should be left with outer circle shapes of the pattern with empty centers and inner circle shapes of the pattern. These will be glued to the painted plastic bowls. If you try to glue them without cutting the center and outer patterns apart and removing the white space between, you will end up with wrinkles, which you don’t want.
Spread a thin layer of glue on the back side of the center plate pattern and press it in the center of the bottom of the bowl. You will have a little time to move it slightly until it looks centered. Press it evenly into the curved shape in the bottom being careful to not make any wrinkles. Spread a thin layer of glue onto the back of the outer plate pattern ring and press it onto the rim of the bowl. The rim may not be exactly round, so eyeball the pattern ring up until it looks evenly spaced around the center pattern. This means it may hang slightly over the side of the plastic bowl in some spots. You can fill this underneath ridge in with gloss mod podge or clear glaze at the end so don’t worry about it. It’s much better to get it all centered correctly than to match the edges of the bowl, because you will mostly be looking at the front of the bowl, not the underside.
When you pattern is dry you can seal the whole dish with gloss mod podge or glaze using several coats on the bottom and top, leaving it just a little thicker on the underneath edges that are hanging over the bowl to even it up. Paint 2 – 3 coats on the bottom and top, letting dry on each side before turning to paint the other.
Make a whole set of matching bowls or make different coordinating patterns to go on a shelf together. You might want to make matching plates to go with the bowls. When making plates you won’t need to worry about wrinkles, so you don’t have to cut the centers out, just use something that is 1″/25mm across as a base. I haven’t tried it, but I have heard that you can make miniature plates out of the base of egg carton cups, so do a search on that technique if your goal is to upcycle (aka turn trash into treasure). And I think that is a very worthy goal, which is why I wrote this tutorial to begin with.
Have fun with it, improve on it and keep nurturing your tiny obsession, my friends!
If you are just joining my rebuild project, you can start with part 1 here.
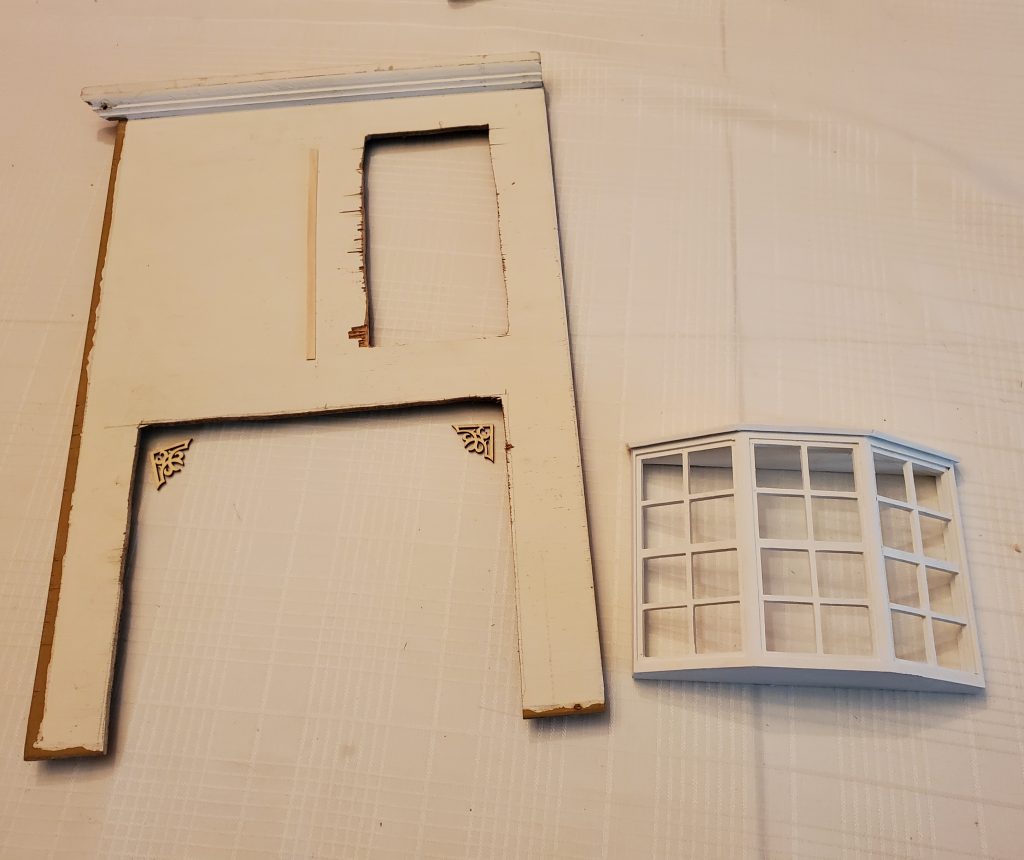
I’ve made progress on widening the window openings and added a second-floor doorway that will go to the new addition. Unfortunately, there was some splintering of the wood when I cut this, so I will have to do a little wood filler in places. I will also frame in this doorway – coffee stir sticks seem to be the correct width, so they will work to frame in and square off the openings. Door and window trim can cover any gaps, and leave a nice, finished look. This doorway won’t have an actual interior door, because it leads to a small sitting room off the master bedroom. This room will have French doors that lead to the second story terrace (I wanted to say balcony, but terrace just sounds classier).
I think the little laser cut wood corbels that I have will add a nice decorative touch in the upper corners of the lower archway, once it is framed in and squared off. Here is a picture of the openings in the wall. Next to that you can see the bay window that is already painted and waiting for the addition I haven’t built yet.
I test-fitted some of the windows and doors which I have already painted. I also made dormers for the roof openings. Getting the angles on the roof pieces was pretty tricky and a lot of trial and error. My husband suggested that I use “geometry” to figure it out, but that just sounded like it would take all the fun out of it.
I found this great metal ribbon (I think it is also sometimes called lamp band) with the correct width to replace the lattice on the small balcony. I will cut short pieces for the ends also and run a painted wood railing along the top. I also think I’ll add a couple window boxes on the front railing, for some greenery and flowers. I want to add some window boxes elsewhere too but haven’t decided where yet. That same metal ribbon will also go around the second-story terrace on the addition and the roof terrace of the main house. This will create even more space for gardens and greenery.
I still have more work to do removing old wallpaper, and then I will get to cutting the pieces for new the addition.
If you have double windows, but really need single windows for your dollhouse, you can convert them with just a pot of boiling water and some wood glue. Read on to find out how.
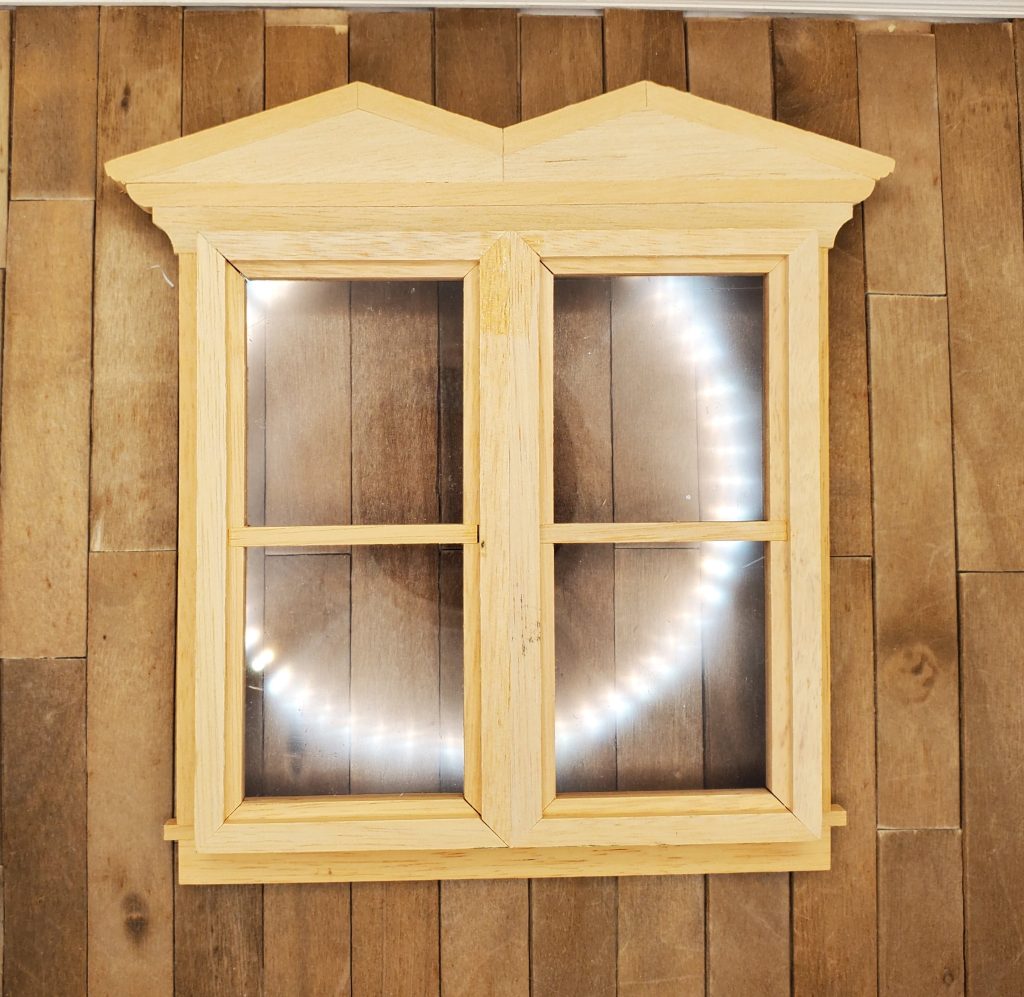
First you start with a basic unfinished wooden double window, like the ones I sell in my Etsy shop. You can use either working or non-working windows. This tutorial covers non-working windows, but the steps to convert working windows are very similar.
Looking at the back of this double window, you can see that it is really made of two single windows side by side. This is lucky for us! It makes creating two separate windows possible with minimal effort.
On to the tutorial!
Step 1: Get a pot of water boiling on the stove. You only need to bring it to a simmer, not a rapid boil. Use a pot large enough to completely submerge your double window.
Step 2: Slide the plastic windowpane inserts out of the windows and set them aside (they slide up and out the top slot of each window). Please don’t put these in the hot water. They will warp and possibly melt. Examine the window closely, so you will know how to reassemble the pieces. I suggest you take some pictures beforehand. It looks simple, but when all the pieces come apart, it’s not so easy to remember.
Step 3: Using tongs (not your hands) submerge the whole window (minus the panes) in the hot water and simmer for a few minutes. Watch the window the whole time. You want to remove it when the glue joints start looking white-ish. This means the glue is softening. Using tongs, pull the window out of the water and gently tug at the edges (wear dishwashing gloves to protect your hands from the heat). If it starts to fall apart, you are ready to start disassembling it. If not, put it back in the water for a bit. As you pull off pieces, you can keep some out, and put others back in the water to continue softening the glue. Don’t pull too soon, or you may split the wood. Also, try not to keep the wood in the hot water longer than necessary. In my experience the pieces won’t warp at all, if your window is made of good hardwood, but better safe than sorry.
Step 4: Allow all pieces to completely dry on a clean towel.
If you are lucky with timing, your window pieces will still be partially assembled when you remove them (like the one pictured on the left above). Then you won’t have to work so hard to reassemble them (like the one on the right which came completely apart).
Step 5: Reassemble the window parts with wood glue, to have two windows instead of one. You want to use only the pieces pictured above. When dry, slide the windowpane back in the top slot. You may also want to stain or paint your windows before doing this.
You will be left with many pediment, sill and trim pieces, as well as interior trim and mullion pieces that came with the window. With a few miter cuts of the exterior trim pieces (there should be 3 vertical outer pieces, and 5 interior pieces), you will have enough trim to frame both windows on the outside, with pieces to spare. You may also find some creative things to do with the leftover pediment, sill and trim (think shelf, mantelpiece and picture frame for starters).
I hope you have enjoyed this tutorial and find it useful.
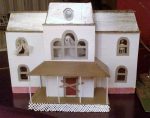
I tried to design a budget-friendly Halloween diorama for my
workplace cubicle decorating contest, and came up with this tutorial for creating
a replica of the house in the movie Psycho. I have always loved that house with
it’s second-empire architecture, and grand cathedral window on the front. I
also added a cemetery on the side with dead trees and gravestones made from
polymer clay, but this tutorial is only about the house. The house in my
pictures is actually 4” wider than the following instructions will create. I
designed mine to fill up my cubicle space, but after I got it together, I
decided it would look better if the main part of the house wasn’t as wide. I
adjusted the measurements to make the entire house 14” wide by 14” high by 6”
deep. In real scale this would be 28’ x 28’ x 12’, but the actual movie house
had another two-story addition on the back. This house is more of a “façade”. I
never remember to track the time it takes me to build miniature projects, but I’d
say I invested about 10 hours over the period of several days to build this.
The Halloween diorama above my work cubicle.
What you need:
Corrugated cardboard – break down a large shipping box
Thin cardboard (like the backer of a writing pad)
Hobby/Craft/Xacto knife with sharp blade
Straight edge ruler and tape measure
Paints (latex or acrylic in greys and browns)
Cardstock and paper cutter, or precut quilling paper 1/8” and ½” wide, for the lattice and siding
Tacky Glue
Masking tape for holding glued parts together temporarily
Wooden coffee stir-sticks and bamboo skewers
Clear plastic packaging or old overhead projector transparency film for windows
Wire edged white lace ribbon or gauzy fabric for curtains
Cutting out all the pieces is half the battle, and the most time-consuming part of this tutorial. Please be careful when using the knife. Cut-proof gloves are recommended. Carefully cut the following pieces from corrugated cardboard with your Xacto knife. Draw them out first with a pencil and straight edge, then cut along the lines using ruler again.
Roof – These are trapezoids, not rectangles, with
either one or both “ends” cut at an angle, with the base being longer than the
top side.
Main house sides: (2) 4” H x 6” base x 4” top
(center top and base so side angles are equal)
Main house front: (1) 4” H x 14” base x 12” top
(center top and base so side angles are equal)
Foyer sides: (2) 4” H x 3” base x 2” top (center
top and base so side angles are equal)
Foyer front: (1) 4” H x 6” base x 5” top (center
top and base so side angles are equal)
Porch sides: (2) 4” H x 5” base x 3” top (line
up top and base at one end so angle is only at other end)
Porch front: (1) 4” H x 10” base x 6” top
(center top and base so side angles are equal)
Floors – Rectangles
First and Second: (2) 6” x 14” (cut slightly
smaller as needed to fit inside walls)
Attic: 6 ½” x 14 ½”
Roof Top: 6 ½” x 12 ½”
Foyer Second: 6” x 3” (cut slightly smaller as
needed to fit inside walls)
Foyer Attic: 6 ½” x 3 ½”
Foyer Roof: 5 ½” x 2 ½”
Porch (also foyer’s first floor): 10” x 5”
Support pieces – Rectangles
Inside room divider walls (remember to cut
doorways in these with your door template, or large archways if desired. Make at
least 1 per floor, to give the house stability): 6” x 4” (cut slightly smaller
as needed to fit).
Porch supports: 10” x 1” and (2) 5” x 1”
Crawl-space supports: (2) 6” x 1” (cut slightly
smaller as needed to fit)
Templates to cut window/door openings in walls
Door opening: 3 ¼” x 1 ½” (trace and cut from
template)
Window openings: 2 ¼” x 1 ¼” (trace and cut from
template)
Print out the provided template document on 8.5” x 11” cardstock, and then cut out the pieces with scissors. Trace these on thin cardboard, making 8 regular windows, one cathedral window, one small oval window and one door frame. Then cut these out using a combination of hobby knife & ruler, and sharp scissors. The door and window opening templates are used in the next step, and don’t need to be traced onto cardboard, as the cardstock itself can be used as a template. As indicated, you want to trace the door and window opening templates inside the border, and the other pieces along the border. This is so that the trim pieces don’t end up being too narrow to cover the window openings, or said another way, so the openings don’t end up too wide to be covered by the trim.
Lay your wall pieces flat to trace and cut out the window and door openings. I don’t have exact measurements for placement, as I “eyeballed-it” on mine. On the house sides, try to put them in the middle for side-to-side spacing. The bottom 1” is the house crawl-space/basement, so locate the window about 1.75” from the bottom. Remember that inside the first floor ends approximately 5” up (including crawl-space), so the second story window should be about 5.75” inches from the bottom. I’d recommend putting the windows no more than 1.5” in from the outer walls in the front, or your porch roof may stick out over the window. At this time, also cut the oval for the window in the foyer roof front.
On the foyer front, put the door opening centered in the
middle, and about ¼” from the bottom, leaving a small “threshold”. I saved the bottom
2.5” rectangle of the door cutout, and trimmed it down just a bit to be the
actual door. I added cloth “hinges” on the back side, so that the door could be
opened and closed. A round head straight pin was added as a door knob, with a
gold seed bead glued on the other end of the pin as the door knob on the other
side. I snipped the extra end of the pin off with wire nippers when the glue
was dry. The cathedral window should be 5.75” from the bottom. The foyer walls
are 1” taller than the main house, plus the porch is the crawl-space under the
foyer. In the front of the main house, I cut archways about 5” wide by 3.5”
high to allow access from the main house. See the pictures for this step, and
line up the front main house and foyer pieces to locate the openings correctly.
Glue your walls and floors together at this point with tacky
glue (using the pictures as a guide), temporarily holding them together with
masking tape. Remember to glue the first floor 1” from the base of the walls,
on the main house, as the first inch is the crawl-space. Put the second floor
of the main house at 5” from the bottom. I glued extra strips of corrugated
cardboard inside the house to act as supports for the first and second floor. Glue
your crawl-space supports inside the main house base. Affix the foyer second
floor 4” up, as there is no crawl-space, and that will make it even with the
main house second floor. Glue the porch base together. While all that is drying,
glue your main house roof pieces to the attic floor, and roof to the top. Affix
foyer roof pieces to the foyer attic floor, and room to the top. Don’t glue
these to the house yet, because painting is much easier before you put it all
together. You could also add roof fencing detail, which is something I didn’t have
time to do, but may add later.
Glue supports under the base of the main house.Interior walls add support to the entire structure. Notice the creepy old photos I printed and framed hanging on the walls.Interior of the foyer showing floor supports glued. I added another piece of cardboard to enclose the top that shows above the main house roof.Main house and foyer with roof and porch base. Roof is not glued to house yet.
I used leftover latex interior house paint for most of my
project, as I was doing this on the cheap. Craft acrylics would also work well.
I painted the interior of my house a light gray color, to look like the walls
were really a dingy white. The exterior will be painted after the “siding” is
applied. The window and door trim will be applied after the siding has been
painted.
Lay out all your window and door trim pieces and paint them
a nice contrasting color. I used a darker gray, to contrast the medium gray
that I planned on painting the exterior.
When dry, glue clear plastic on the back of your window trim
as glass windowpane. I left little “broken” spaces on some of them, and left
out the cross piece and the whole glass pane on the top left window, so I could
make the curtains “flap” outside the window. I got this idea from a photo of someone
else’s similar model, so I cannot claim originality. However, it is said that imitation
is the sincerest form of flattery.
Trim pieces painted. I started gluing them to the transparency film too. There is a half-moon window above the door too.
After the roof is glued and dried, you can paint it. I
painted this brown, and then went back over it with a thin coat of metallic
gold acrylic paint. I was going for a copper roof look, and think it turned out
pretty well. If you wanted to get really fancy – and expensive – you could glue
copper sheeting to your roof. Another roof option would be to cut more paper siding,
and then cut vertical tabs every ¼” to look like wood shingles and paint it a
light brown. Paint the porch roof pieces at this time too, but don’t glue them
yet.
Cut white cardstock into ¼” strips with a paper cutter (or use premade quilling paper). Starting 1” above the base of the house (I did this WRONG in my picture, and had a remove the bottom 1” of siding later), glue each strip of paper horizontally, overlapping the previous piece by 1/8” working your way up. Cut around door and window openings.
Leave the front part of the house that will be covered by the foyer bare, and just paint that later. It will end up being interior wall. Try to leave the very bottom edge of the siding free from glue, and just glue at the top edge. When paint is applied, it will cause the siding to warp and curl a little bit, giving it an aged look. If you DON’T want this effect, glue the siding down completely. Allow the glue to dry thoroughly, prior to painting the house exterior. Paint 6 additional ¼” strips to fold in half lengthwise into a right angle, and glue vertically at each corner of the house as a cap. I also folded pieces in half lengthwise, with painted side in, and put them at the joint between the main house and foyer. I glued them only to the foyer, so that I could keep the two pieces apart, to be easily transported. This is difficult to describe, but maybe you can see it in the picture.
Siding strips are glued to cover the corners and the joints between the foyer and house. Here you can also see the porch roof and supports assembled.
Paint the porch base black and the top brown, or gray if you prefer. After painting the exterior of the house and allowing it to dry, you can glue all the window trim with panes on the walls. You may lue the roof pieces to the house and foyer now too. It is also time to glue the porch roof to the foyer between the first and second floors. Cut pieces of bamboo skewers and paint them, then glue them in place as porch support railings. You can also get fancy by creating porch railing details with toothpicks, but I didn’t have time. I may go back and add that detail next year. Now, print out the half scale brick sheet provided, and cut them into 1” strips to glue on the foundation of the house.
The last step is to cut 1/8” strips of cardstock and glue them at an angle to create the porch base lattice. I used matte mod podge for this, rather than tacky glue, but either would work. You could also paint this on with a steady hand with white paint, but you won’t get the raised detail. You could also just surround the porch base with brick paper, if you wanted, or paint it a solid color.
For the finishing details, I used wood coffee stir sticks
that I aged with a vinegar and steel wool solution (find this process easily with
an online search), broke off pieces and glued them over the front door with
KEEP OUT!!! in black marker. I glued pieces of wire edged lace in the upstairs window
and shaped them to look like they are flapping in the wind. White gauzy
material soaked in a mixture of white glue and water, squeezed out and formed
until dry will also have a similar effect. That is how I made the ghost in the
upstairs foyer window, by the way. Of course, that room really needs an empty ½
inch scale rocking chair to be complete. A cotton ball stretched out and clinging
to porch corners also adds a creepy, spider-webby, abandoned look to the house.
Go ahead and furnish your house if you want. Add a cemetery or any other creepy accessories. Have fun with this project and make it your own! Thanks for reading my blog. Be sure to come back as I add projects from time to time.
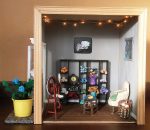
I really enjoy making miniature room boxes. They allow so much creativity, and present a fun challenge at times. My friend opened a new yarn shop in Neenah, and I wanted to give her something to celebrate the occasion, so I created a miniature yarn shop scene.
This is what the final result looks like.
Tiny 1:12 scale yarn shop filled with goodies
I used her actual shop as the inspiration for my room box.
Fibre yarn shop in Neenah, WI
I spent about 25 hours total on this, I would guess, over the period of several weekends. The box itself is made from basswood and foam core, so it is very lightweight, but also a little fragile. In the future I would still work with basswood, but I think a thicker piece could provide more stability. Still, a thicker piece may not be able to be cut with an Exacto knife, and I found it really easy to work with for cutting out the windows and doors. For the brickwork on the front, I used a hot wire foam cutting tool. I hung the door with tiny hinges, and made the window able to be opened. Both the door and window are made from scratch with basswood, and each part of the frame was cut twice, so I could glue a plexiglass pane in the center. I kind of wish I had added an awning. I think that would have been a nice touch.
Brick and stone are made with a hot foam cutting tool
I also added a battery powered LED light string along the ceiling. The battery pack hangs out the back, where it can’t be seen. I love these little wire strings of LED lights. You can used them for so many things.
I used a piece of dollhouse trim I had leftover to frame the box. The wood flooring is made from coffee stir sticks, cut and glued in a staggered pattern and then stained with Minwax.
The yarn hanks are quite easy and fun to make. I separated the strands of many colors of embroidery thread. I even had some variegated tatting thread colors that I picked up at a yard sale, which were already single strand. I’m sorry I don’t have any pictures, but I will try to explain the process. It is really just a modification on twisting a full-sized skein of yarn into a hank. Check out some of these YouTube videos for an example.
If you grab one strand of the embroidery thread, and pull the others away from it, you can extract one strand quite easily.
Keep pulling until you have the length you want, and then cut.
Now take the strand and wrap it around four fingers, about 10 – 20 times, depending on how thick you want the skein to be.
Pull the loops off your fingers, keeping them in an oval, and pinch one end with your thumb and forefinger.
Put a toothpick inside the other endloop, and twist the whole thing about 7 times until it feels tight, but not too tight.
Fold the twisted skein in half – it will start to twist back on itself – and put the endloop you had pinched over the toothpick, on top of the other endloop.
The trickiest part is pulling the bottom endloop up and over the top endloop, which is why you don’t want to twist it too tight.
Now remove the toothpick, and as you do, pull the bottom endloop completely through the top one. This is what holds the hank together.
Voila! An adorable yarn hank. Then I just made about 50 more of them:-)
The only items that aren’t handmade, are the miniature spinning wheel, the clock (which is the face of a really cool wristwatch, and I fashioned a wire stand on the back), and the tiny coffee mug, donuts and croissant on the coffee table, which I bought from another artisan.
Knitting on tiny needles made from toothpicks is quite a challenge.
I do have some pictures of making the chair, but I think I will save that for a separate post. If you like what you see or have any questions on how I made something, please leave a comment, and I will try to review it in a timely manner – but make no promises;-) I would however, love to see some actual legitimate comments on my posts, as opposed to the endless stream of spam nonsense comments that I continually have to delete. Really, what is that about anyway? Is there some big money to be made by posting gobbledy-gook comments on blog posts?? But, I digress… I hope you enjoyed seeing my minature yarn shop roombox.
If you are interested in seeing my handmade miniatures that I have for sale, please visit my Thumbwick Miniatures Etsy shop.


