This tutorial will detail how to create a tin ceiling in your dollhouse from materials you can find at your local Dollar Tree store. I love shopping there, because everything is just $1, so it makes me feel rich😊 If you don’t have a local Dollar Tree (this store used to be called Everything’s a Dollar, but the name changed a while back), you may have a similar type dollar store, and chances are they have similar items, so check it out.
One thing you may need for this project, which you can’t find at your local dollar store is E6000 glue or 527 multi-purpose cement, which I recommend for certain steps. However, you will still have to tape things in place while they dry, so regular white glue or craft tacky glue will work too. I also used 15 mm silver three flower leaf bead cap jewelry findings for the ceiling light medallion which are not from the Dollar Tree. I found these on an Etsy site (https://www.etsy.com/listing/565810655/15mm-antiqued-bronzegolddull-silverwhite) for even less than a dollar – wohoo!
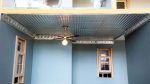
I decided a long time ago that the kitchen of my Bellingham Farmhouse was going to have wood plank flooring and a tin ceiling. I originally tried to design my own tin ceiling tiles, and emboss the pattern into aluminum sheeting with a stylus. I didn’t end up liking how this looked in the end, so I tore it out. Then I found aluminum cookie sheets at the Dollar Tree, which had a cool pattern, and thought I should try making the ceiling out of those. On a recent vacation from work, I put together a tutorial of the process. Following, are the steps I took to achieve the result in the photo above.
Tools needed:
- Old scissors for cutting the aluminum (NOT your good sewing shears)
- Work gloves
- Ruler/straight edge
- Wooden craft stick, stir stick or any stick of desired width for the trim
- Size 3/8” and 3/4” circle punches, or size needed to fit (optional for ceiling light medallion)
- Pencil
Materials needed:
- Dollar Tree aluminum cookie sheets (pack of 2)
- Dollar Tree craft glue, regular or tacky or white glue
- E6000 glue or 527 multi-purpose cement (optional)
- 15 mm silver three leaf bead caps (optional)
- Scratch paper
- Cellophane tape and masking tape (you can also get these at the Dollar Tree)

Steps:
First you need to assess the ceiling area that you want to cover. Does it already have a light, or will a ceiling light be added?


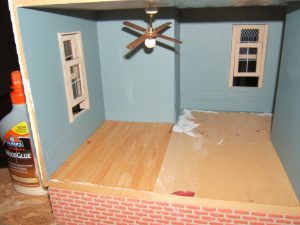
In my case, I already had a light wired, and that wiring was underneath the glass bathroom floor tiles above, which had already been glued down. Bad planning on my part. I decided to work around the light, rather than tear up the bathroom flooring. I measured the ceiling, and made a paper template of it, including marking out where the light fixture was. Because of the light fixture situation, I chose a layout of 4” square ceiling tiles – so I could cut out a little slot to slide one tile around the light fixture wire.

Then I started cutting out 4” by 4” squares from the cookie sheets. This aluminum sheet gets very sharp when it is cut, so it is best to wear a pair of work gloves while cutting and handling it. Unless you prefer to bleed on your project and have bandages on all your fingers… It is very important to keep the pattern in mind. One side is a little shinier that the other. I chose to put that side out, and the duller side towards the ceiling. Cut carefully between the smooth and patterned sections of the aluminum sheet. You can use these smooth sections of the aluminum to make trim pieces. You will also use the pattern around the perimeter to make your coving pieces, so try not to damage that either.

Your pieces will need to fit together, so that the pattern lines up. Start to arrange them on your template. Pay very close attention to the bumps and ridges in your pattern so that one piece doesn’t get turned sideways. It may not be very apparent now, but it will be after you install it, so double check everything. You should have enough metal to cut new pieces if you make a mistake. Remember that you will need to lay your pieces face down on the template, so that they will be correct when you glue them to the ceiling. If you lay the pieces face up, they will be backwards, and if you cut around walls, or light fixtures, those holes will be in the wrong position when you try to install the ceiling. Notice the small notch cut out in the top left side of the center tile, in the photo below. That is for the light fixture wire.

I used cellophane tape to lightly tape the pieces together. I taped the front row together, but not the back rows to the front. This is so I could install the back part of the ceiling first, and then slide the front row around the light, as I installed it. If I made the whole ceiling as one sheet, I would not be able to do this. I used the template as a guide to determine where to cut around the walls.

I laid the back portion inside the room, facing down. This is how it will be when installed, with the “right” side facing down. I applied craft glue to the whole surface, and allowed it to become tacky (about 10 minutes). Then I installed the whole sheet on the ceiling, pressing it in place, and holding it with pieces of masking tape.


Then I tried to patiently wait for that panel to dry before installing the front panel. I am not very good at patiently waiting. I took a trip to the Dollar Tree to avoid the temptation of trying to glue the next panel too soon. I found some Reindeer Moss, which I love to use in miniature dried floral arrangements. It has such a nice earthy aroma, and interesting branching. They don’t usually have that in stock, so I got three bags. I also picked up some floral moss that looked like it might be good for making HO scale model railroad trees and shrubs. My husband has a very large layout that he works on all the time. When I showed him the floral moss, he loved it.
I installed the front panel the same as the back one, sliding the notch around the light fixture wire. Then I taped that into place to dry. While that dried, I prepared the coving and trim pieces.

I measured out each run of wall to see how long of trim pieces I needed, and wrote them on a piece of scratch paper. In the photo, you can see that I did not make the coving pieces a little longer than I needed them, and ended up having to make a couple more. When you measure the length you will need for each piece of coving, add a full extra inch. You will need this so you can cut the ends at an angle to meet nicely at the corners. Originally I prepared enough trim pieces needed to cover each seam between each 4” square of ceiling tile, but once I had the ceiling in place, I didn’t think that trim was needed, and thought it would detract from the overall look. I ended up just using the coving pieces and trim for the perimeter.


To make the trim pieces, I wrapped strips of flat aluminum around a piece of 12” long wood trim that was 1/8” wide by 1/16” thick. Again, it’s best to wear gloves for this. Then I slid the wood piece out, and with the rounded back of a spoon, I flattened out the edges. Now the trim pieces don’t have sharp edges. It’s a little tricky to keep these a uniform width, but using the wood piece as a guide is very helpful. I only needed one long trim piece for the front edge of my room, and a shorter one for the back archway between the kitchen and dining room, where the kitchen ceiling ends and dining room ceiling begins, to give it a finished look.
To make the coving that will angle between the wall and ceiling, I cut around the edge pattern of the cookie sheet, trying to leave about ¼” of smooth aluminum to the side of each long edge. Then I folded about 1/8” of the edges in, so they wouldn’t be sharp. I made as long of strips as I could, so I could cut the lengths I needed later. I chose the pattern bumps to face out, but you could do it the other way, depending on how you want it to look. Either way you choose, remember to be consistent. If the bumps will face out, then fold the edges away from the bumps. Run the edge of the back of your spoon along the edges to flatten them. Be careful not to flatten out your pattern bumps in the process. Now slightly bend the long edges in a curve, so your coving will have a slight ‘C’ shape against the point where wall meets ceiling. This is hard to explain, so I hope the pictures will help.
I glued the trim pieces and taped them in place with E6000 Glue. Then I held each piece of coving in place to determine the angle to cut the ends, so they would meet cleanly against the other pieces at the corners. I eyeballed this up, but I suppose there is an exact mathematical angle degree you can cut them at, I just don’t know what that would be. Notice how outside corner have to be cut at angles the opposite way that inside corners do. Again, I hope the pictures will help to explain this. I glued and taped the coving in place and let it all dry.

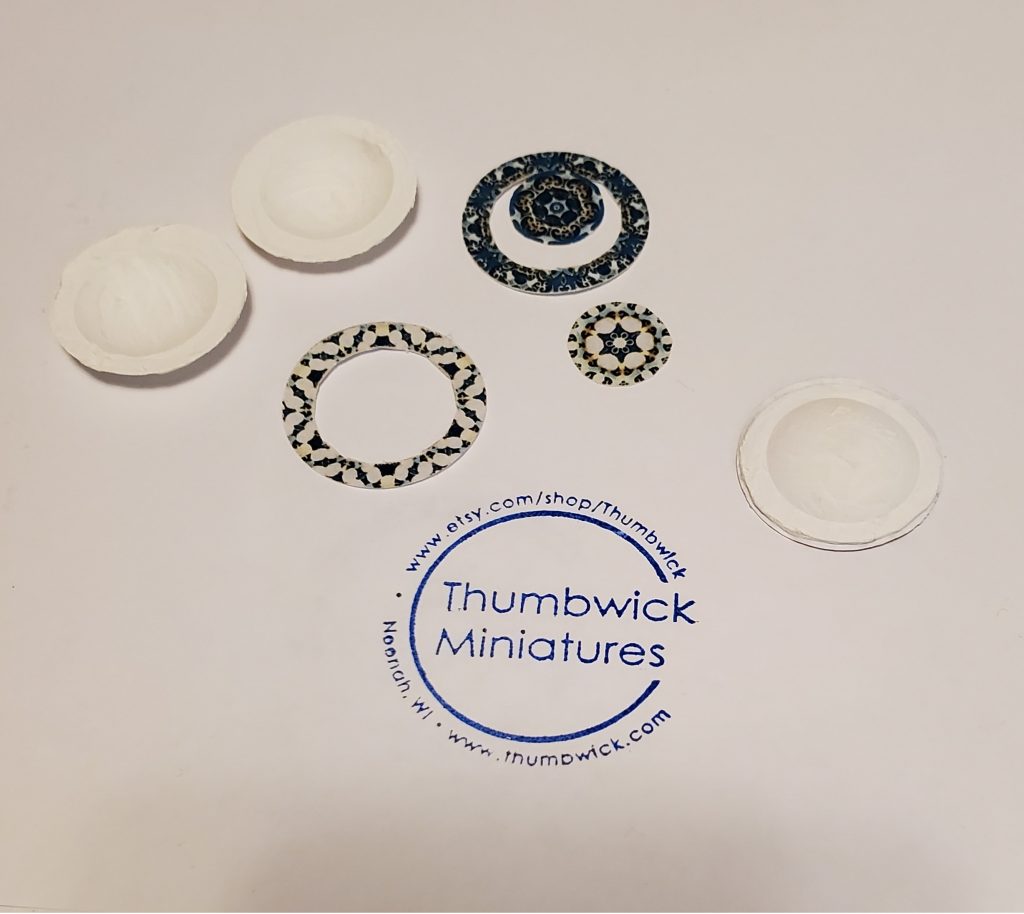
Then I punched out a circular form for the medallion to cover the ceiling light. I first punched out a 3/8” circle from a piece of smooth metal. I used another piece of aluminum sheet that I had on hand, but you can cut it from the corner of the cookie sheet. This is where you will find a big enough piece to work with. Then I eyed up the punched hole in the center of the 3/4” punch, to punch a larger circle around it.
I flattened three 15 mm silver three leaf bead caps with my fingers, which is easy to do, as they are very pliable. Then I broke off each leaf from them, by bending them until they snapped off, and glued seven of them in a circle pattern to the metal circle that I just punched out. You could probably improve on this design, by making your metal circle larger and adding more leaves to make it more intricate.


When all that was dry, I bent the whole thing into a slight bowl shape, and cut a slit in the medallion, so I could slip it around the light base. I glued it in place with E6000 glue and held it with masking tape overnight until dry.

When everything is finally dry, you can remove all the masking tape, and your ceiling is done.

I am thinking about using some of the leftover cookie sheet metal to make a tin backsplash to go above my counters in the kitchen. If I do, I will try to add pictures of it and my completed kitchen to my blog later.
I hope you enjoyed this tutorial. Please visit my Etsy shop, if you want to see more of my handmade dollhouse miniatures. I also sell some craft and miniature making supplies, and am adding new things all the time.
Happy miniature making!
-Margie