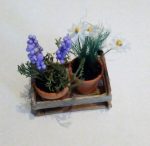
This tutorial will tell you how you can make a 1:12 scale miniature pair of potted rosemary and chamomile plants in a wooden crate, like the one pictured here. I apologize in advance, because my pictures are not great. I know that, and I’m trying to improve, but tiny items are difficult to photograph clearly. Please remember that this is not a tutorial on taking great pictures. It most definitely is not.

Here is a list of things you will need:
– Polystyrene foam microbeads – smallest you can find like around 1 mm in diameter works best (like the kind used in floam). I found some on Etsy.
– Green jute twine (or natural color and you can paint it green). I found this at Dollar Tree.
– Green embroidery floss
– Reindeer moss (I found this at Dollar Tree too)
– White glue (like Elmers)
– Sawdust (I got some off my husband’s workroom floor)
– White tissue paper
– Approximately 1/4″ mini flower punch (I used the Mini Daisy punch by Punch Bunch)
– Acrylic craft paints in purple, yellow, black and brown
– Paper cups and plates
– Needle or straight pin
– Floral foam (optional)
– 5 1/2″ wood coffee stirrers with flat ends, not rounded, or you can cut the ends off flat (I got 1,000 of these on Amazon)
– Miniature pots (buy these or try to make your own if you are feeling extra crafty – here’s a tutorial to make cute ones out of paper – http://1inchminisbykris.blogspot.com/2010/04/paper-pottery.html). I also have the mini terracotta pots pictured available on my Etsy site.

To make the soil:
Put about 1/8 – 1/4 cup of sawdust in a small paper cup. Add a couple drops of black and brown paint and mix it thoroughly with a coffee stirrer or other wooden stick. You don’t want to make it too saturated, just color it all a nice dirt color. Then spread it out on a paper plate to dry.
To make the rosemary flowers:
Put a small handful of foam microbeads in a paper cup. Add a couple drops of purple paint and mix it thoroughly with a wooden stick. When all the beads are colored, spread them out on a paper plate to dry. While they dry, occasionally stir them so they don’t all clump together. These will be your flower buds.
Separate the strands of a 2″ piece of green embroidery floss. With your fingers, coat each strand with white glue and lay to dry on a piece of wax paper. Wipe your fingers frequently to they don’t stick to your fingers. Move them around so they don’t stick in place while they dry. They should end up kind of stiff, but not “globby” at all. These are your flower stems.
Coat about 1/4″ of the end of each flower stem with white glue. Then roll it around in the purple painted foam beads. Lay these aside to dry, or you can poke a hole with a pin in floral foam and stand them up to dry. Make several of these. When dry shake off any loose beads.
Pick through the reindeer moss to find the best pieces that are kind of sprawly and bushy – don’t know how to describe this, but look for the pieces that look most like rosemary foliage. Get about 3 or 4 good ones for each plant you want to make. Trim your flowers (3 look nice) to the desired height and add to the middle of the moss. Glue the whole bunch together at the base with white glue, squeezing together with your fingers. Let dry.
Thin some white glue with water to work with it easier. Smear the inside of your clay pot with the diluted white glue and fill with your newly made soil. Shake out the soil that doesn’t stick in the pot. Put another small glob of glue in the bottom of the pot and glue your flowers and foliage bunch in the middle. Put some more dabs of glue strategically around the arrangement, packing in soil up to the top of the pot. Let this dry.
To make the chamomile flowers:
Put about a dozen or so foam microbeads in a paper cup. You only need one for the center of each flower, so you don’t need many. Color them yellow and dry them in the same process you used above for the rosemary flowers.
Fold your tissue paper 3 layers thick and punch out daisy flowers. Poke a hole in the center of the 3 layer flower with a straight pin. Using the same stems you made above for the other flowers, push the stem barely through the hole in one flower, and secure in place with a dab of white glue. Moisten your finger and pick up just one yellow foam bead and press it onto the dab of glue in the center of your flower on the stem. Lay this aside or stick in floral foam to dry. Make several of these too.
For the chamomile foliage cut a 1 1/4″ piece of green jute twine. Hold the very end and separate and fray the rest of the length of twine, until you have a nice grassy looking clump. Make a few of these for each plant.
Use the same process above to make bunches of foliage and flowers and arrange them in the pot with soil.
To make the wooden crate:
Your dimensions may be different, depending on the size of the pots you use, so adjust accordingly. I pre-aged my wooden coffee stir sticks to give my crates a rustic look, but this is optional. Here are a couple nice tutorials on aging wood using the vinegar & steel wool method, but there are dozens out there if you look: https://www.lilblueboo.com/2014/04/how-to-antique-and-age-wood-instantly-for-a-weathered-look.html Or https://www.thenavagepatch.com/aging-wood-vinegar-steel-wool.
I have found it to be true that the older your vinegar/steel wool solution is, the darker your wood will be. The wood in my crates was treated with a solution aged 24 hours, and painted with black tea before the vinegar solution. It turned a lovely light grey. I tried the same method with the same solution 2 weeks later, and the wood turned a very dark brown.
From your wooden coffee stir sticks, cut 5 pieces 1 1/2″ long, and 4 pieces 7/8″ long. These cut really easily with a pair of scissors, but the end always goes flying off somewhere, and you need to go find it. I’ve lost many pieces in my carpet, which I find later with the vacuum cleaner. So, maybe try to cut them over a box or something.
Lay 3 of the longer pieces flat, horizontally, evenly spaced out to cover 7/8″ wide. Take two of the shorter pieces, and place them at either of the short ends, perpendicular to the bottom pieces, on top of the very ends of the bottom pieces. Glue them upright vertically in place with white glue, or if you have wood glue, use that, as it will work even better. Hold them up by sandwiching the whole thing between two small boxes, leaning the vertical pieces just barely against the supports to keep them vertical while they dry. When dry, take two of the longer pieces and glue them vertically along the longer sides, on top of the ends of the two short pieces you just glued. You are staggering them as you build up the sides of the box. Follow the picture as a guide. This isn’t how a real crate is made, because a real crate would have a vertical pieces of wood at each corner that you nail the horizontal sides to, and supports framing the bottom of the crate, but since we are working in miniature, you can skip the corner supports, and it still holds together, and more importantly, looks cute. Now glue your last two shorter pieces vertically upright along the shorter sides, on top of the ends of the longer pieces you glued and let dry. So the shorter ends each have two slats, the longer ends have one slat and the bottom has three slats when finished. Feel free to improve on this design, as I’m sure you can. Square toothpicks might be good to use for corner supports, if you want to make your crates look more detailed and realistic. You could also make tiny dots at the corners with a marker to resemble nail heads.
When everything is dry, place your two pots of flowers in your crate. Step back and admire your creation with pride.
Excellent Ꮩalue, Quality Storage. І am in love ѡith tһis !
!