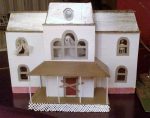
I tried to design a budget-friendly Halloween diorama for my workplace cubicle decorating contest, and came up with this tutorial for creating a replica of the house in the movie Psycho. I have always loved that house with it’s second-empire architecture, and grand cathedral window on the front. I also added a cemetery on the side with dead trees and gravestones made from polymer clay, but this tutorial is only about the house. The house in my pictures is actually 4” wider than the following instructions will create. I designed mine to fill up my cubicle space, but after I got it together, I decided it would look better if the main part of the house wasn’t as wide. I adjusted the measurements to make the entire house 14” wide by 14” high by 6” deep. In real scale this would be 28’ x 28’ x 12’, but the actual movie house had another two-story addition on the back. This house is more of a “façade”. I never remember to track the time it takes me to build miniature projects, but I’d say I invested about 10 hours over the period of several days to build this.

What you need:
- Corrugated cardboard – break down a large shipping box
- Thin cardboard (like the backer of a writing pad)
- Hobby/Craft/Xacto knife with sharp blade
- Straight edge ruler and tape measure
- Paints (latex or acrylic in greys and browns)
- Cardstock and paper cutter, or precut quilling paper 1/8” and ½” wide, for the lattice and siding
- Tacky Glue
- Masking tape for holding glued parts together temporarily
- Wooden coffee stir-sticks and bamboo skewers
- Clear plastic packaging or old overhead projector transparency film for windows
- Wire edged white lace ribbon or gauzy fabric for curtains
Cutting out all the pieces is half the battle, and the most time-consuming part of this tutorial. Please be careful when using the knife. Cut-proof gloves are recommended. Carefully cut the following pieces from corrugated cardboard with your Xacto knife. Draw them out first with a pencil and straight edge, then cut along the lines using ruler again.
Roof – These are trapezoids, not rectangles, with either one or both “ends” cut at an angle, with the base being longer than the top side.
- Main house sides: (2) 4” H x 6” base x 4” top (center top and base so side angles are equal)
- Main house front: (1) 4” H x 14” base x 12” top (center top and base so side angles are equal)
- Foyer sides: (2) 4” H x 3” base x 2” top (center top and base so side angles are equal)
- Foyer front: (1) 4” H x 6” base x 5” top (center top and base so side angles are equal)
- Porch sides: (2) 4” H x 5” base x 3” top (line up top and base at one end so angle is only at other end)
- Porch front: (1) 4” H x 10” base x 6” top (center top and base so side angles are equal)
Floors – Rectangles
- First and Second: (2) 6” x 14” (cut slightly smaller as needed to fit inside walls)
- Attic: 6 ½” x 14 ½”
- Roof Top: 6 ½” x 12 ½”
- Foyer Second: 6” x 3” (cut slightly smaller as needed to fit inside walls)
- Foyer Attic: 6 ½” x 3 ½”
- Foyer Roof: 5 ½” x 2 ½”
- Porch (also foyer’s first floor): 10” x 5”
Support pieces – Rectangles
- Inside room divider walls (remember to cut doorways in these with your door template, or large archways if desired. Make at least 1 per floor, to give the house stability): 6” x 4” (cut slightly smaller as needed to fit).
- Porch supports: 10” x 1” and (2) 5” x 1”
- Crawl-space supports: (2) 6” x 1” (cut slightly smaller as needed to fit)
Templates to cut window/door openings in walls
- Door opening: 3 ¼” x 1 ½” (trace and cut from template)
- Window openings: 2 ¼” x 1 ¼” (trace and cut from template)
Print out the provided template document on 8.5” x 11” cardstock, and then cut out the pieces with scissors. Trace these on thin cardboard, making 8 regular windows, one cathedral window, one small oval window and one door frame. Then cut these out using a combination of hobby knife & ruler, and sharp scissors. The door and window opening templates are used in the next step, and don’t need to be traced onto cardboard, as the cardstock itself can be used as a template. As indicated, you want to trace the door and window opening templates inside the border, and the other pieces along the border. This is so that the trim pieces don’t end up being too narrow to cover the window openings, or said another way, so the openings don’t end up too wide to be covered by the trim.
Lay your wall pieces flat to trace and cut out the window and door openings. I don’t have exact measurements for placement, as I “eyeballed-it” on mine. On the house sides, try to put them in the middle for side-to-side spacing. The bottom 1” is the house crawl-space/basement, so locate the window about 1.75” from the bottom. Remember that inside the first floor ends approximately 5” up (including crawl-space), so the second story window should be about 5.75” inches from the bottom. I’d recommend putting the windows no more than 1.5” in from the outer walls in the front, or your porch roof may stick out over the window. At this time, also cut the oval for the window in the foyer roof front.
On the foyer front, put the door opening centered in the middle, and about ¼” from the bottom, leaving a small “threshold”. I saved the bottom 2.5” rectangle of the door cutout, and trimmed it down just a bit to be the actual door. I added cloth “hinges” on the back side, so that the door could be opened and closed. A round head straight pin was added as a door knob, with a gold seed bead glued on the other end of the pin as the door knob on the other side. I snipped the extra end of the pin off with wire nippers when the glue was dry. The cathedral window should be 5.75” from the bottom. The foyer walls are 1” taller than the main house, plus the porch is the crawl-space under the foyer. In the front of the main house, I cut archways about 5” wide by 3.5” high to allow access from the main house. See the pictures for this step, and line up the front main house and foyer pieces to locate the openings correctly.

Glue your walls and floors together at this point with tacky glue (using the pictures as a guide), temporarily holding them together with masking tape. Remember to glue the first floor 1” from the base of the walls, on the main house, as the first inch is the crawl-space. Put the second floor of the main house at 5” from the bottom. I glued extra strips of corrugated cardboard inside the house to act as supports for the first and second floor. Glue your crawl-space supports inside the main house base. Affix the foyer second floor 4” up, as there is no crawl-space, and that will make it even with the main house second floor. Glue the porch base together. While all that is drying, glue your main house roof pieces to the attic floor, and roof to the top. Affix foyer roof pieces to the foyer attic floor, and room to the top. Don’t glue these to the house yet, because painting is much easier before you put it all together. You could also add roof fencing detail, which is something I didn’t have time to do, but may add later.


I used leftover latex interior house paint for most of my project, as I was doing this on the cheap. Craft acrylics would also work well. I painted the interior of my house a light gray color, to look like the walls were really a dingy white. The exterior will be painted after the “siding” is applied. The window and door trim will be applied after the siding has been painted.
Lay out all your window and door trim pieces and paint them a nice contrasting color. I used a darker gray, to contrast the medium gray that I planned on painting the exterior.
When dry, glue clear plastic on the back of your window trim as glass windowpane. I left little “broken” spaces on some of them, and left out the cross piece and the whole glass pane on the top left window, so I could make the curtains “flap” outside the window. I got this idea from a photo of someone else’s similar model, so I cannot claim originality. However, it is said that imitation is the sincerest form of flattery.

After the roof is glued and dried, you can paint it. I painted this brown, and then went back over it with a thin coat of metallic gold acrylic paint. I was going for a copper roof look, and think it turned out pretty well. If you wanted to get really fancy – and expensive – you could glue copper sheeting to your roof. Another roof option would be to cut more paper siding, and then cut vertical tabs every ¼” to look like wood shingles and paint it a light brown. Paint the porch roof pieces at this time too, but don’t glue them yet.
Cut white cardstock into ¼” strips with a paper cutter (or use premade quilling paper). Starting 1” above the base of the house (I did this WRONG in my picture, and had a remove the bottom 1” of siding later), glue each strip of paper horizontally, overlapping the previous piece by 1/8” working your way up. Cut around door and window openings.

Leave the front part of the house that will be covered by the foyer bare, and just paint that later. It will end up being interior wall. Try to leave the very bottom edge of the siding free from glue, and just glue at the top edge. When paint is applied, it will cause the siding to warp and curl a little bit, giving it an aged look. If you DON’T want this effect, glue the siding down completely. Allow the glue to dry thoroughly, prior to painting the house exterior. Paint 6 additional ¼” strips to fold in half lengthwise into a right angle, and glue vertically at each corner of the house as a cap. I also folded pieces in half lengthwise, with painted side in, and put them at the joint between the main house and foyer. I glued them only to the foyer, so that I could keep the two pieces apart, to be easily transported. This is difficult to describe, but maybe you can see it in the picture.

Paint the porch base black and the top brown, or gray if you prefer. After painting the exterior of the house and allowing it to dry, you can glue all the window trim with panes on the walls. You may lue the roof pieces to the house and foyer now too. It is also time to glue the porch roof to the foyer between the first and second floors. Cut pieces of bamboo skewers and paint them, then glue them in place as porch support railings. You can also get fancy by creating porch railing details with toothpicks, but I didn’t have time. I may go back and add that detail next year. Now, print out the half scale brick sheet provided, and cut them into 1” strips to glue on the foundation of the house.
The last step is to cut 1/8” strips of cardstock and glue them at an angle to create the porch base lattice. I used matte mod podge for this, rather than tacky glue, but either would work. You could also paint this on with a steady hand with white paint, but you won’t get the raised detail. You could also just surround the porch base with brick paper, if you wanted, or paint it a solid color.
For the finishing details, I used wood coffee stir sticks that I aged with a vinegar and steel wool solution (find this process easily with an online search), broke off pieces and glued them over the front door with KEEP OUT!!! in black marker. I glued pieces of wire edged lace in the upstairs window and shaped them to look like they are flapping in the wind. White gauzy material soaked in a mixture of white glue and water, squeezed out and formed until dry will also have a similar effect. That is how I made the ghost in the upstairs foyer window, by the way. Of course, that room really needs an empty ½ inch scale rocking chair to be complete. A cotton ball stretched out and clinging to porch corners also adds a creepy, spider-webby, abandoned look to the house.
Go ahead and furnish your house if you want. Add a cemetery or any other creepy accessories. Have fun with this project and make it your own! Thanks for reading my blog. Be sure to come back as I add projects from time to time.