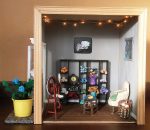
Miniature Yarn Shop Room Box

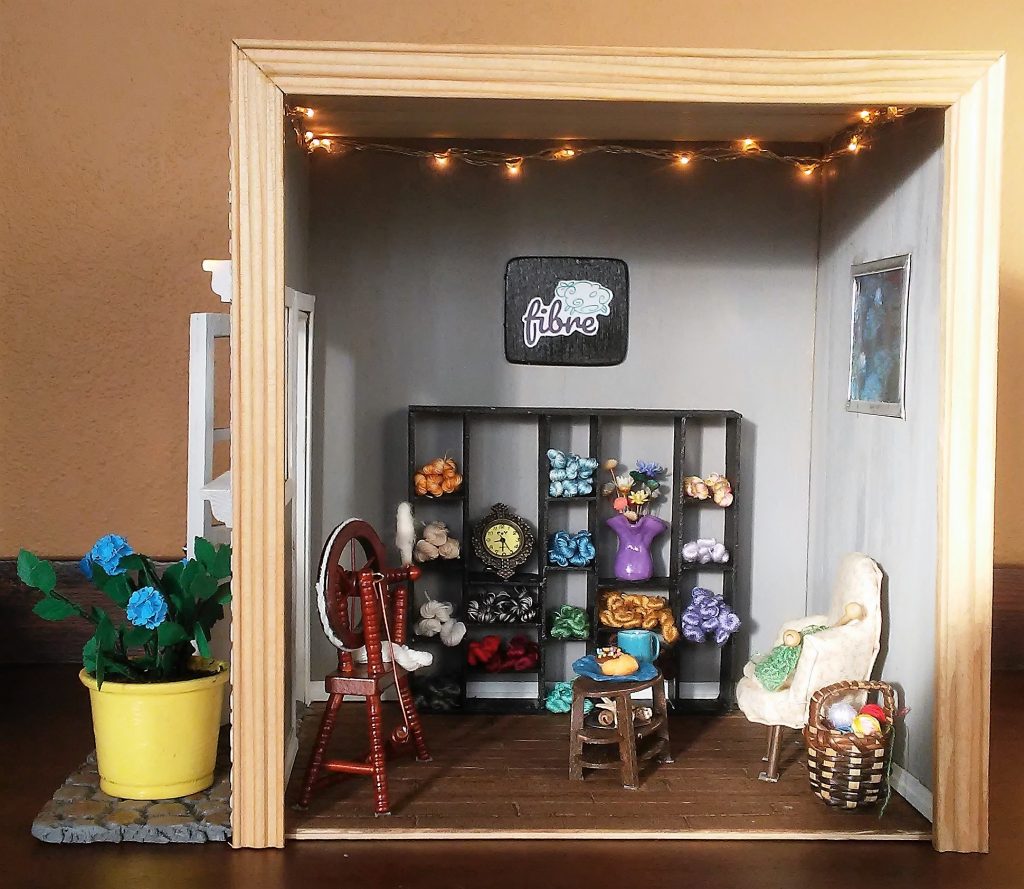
I really enjoy making miniature room boxes. They allow so much creativity, and present a fun challenge at times. My friend opened a new yarn shop in Neenah, and I wanted to give her something to celebrate the occasion, so I created a miniature yarn shop scene.

This is what the final result looks like.

Tiny 1:12 scale yarn shop filled with goodies

I used her actual shop as the inspiration for my room box.

Fibre yarn shop in Neenah, WI

I spent about 25 hours total on this, I would guess, over the period of several weekends. The box itself is made from basswood and foam core, so it is very lightweight, but also a little fragile. In the future I would still work with basswood, but I think a thicker piece could provide more stability. Still, a thicker piece may not be able to be cut with an Exacto knife, and I found it really easy to work with for cutting out the windows and doors. For the brickwork on the front, I used a hot wire foam cutting tool. I hung the door with tiny hinges, and made the window able to be opened. Both the door and window are made from scratch with basswood, and each part of the frame was cut twice, so I could glue a plexiglass pane in the center. I kind of wish I had added an awning. I think that would have been a nice touch.

Brick and stone are made with a hot foam cutting tool

I also added a battery powered LED light string along the ceiling. The battery pack hangs out the back, where it can’t be seen. I love these little wire strings of LED lights. You can used them for so many things.

I used a piece of dollhouse trim I had leftover to frame the box. The wood flooring is made from coffee stir sticks, cut and glued in a staggered pattern and then stained with Minwax.

The yarn hanks are quite easy and fun to make. I separated the strands of many colors of embroidery thread. I even had some variegated tatting thread colors that I picked up at a yard sale, which were already single strand. I’m sorry I don’t have any pictures, but I will try to explain the process. It is really just a modification on twisting a full-sized skein of yarn into a hank. Check out some of these YouTube videos for an example.

  • If you grab one strand of the embroidery thread, and pull the others away from it, you can extract one strand quite easily.
  • Keep pulling until you have the length you want, and then cut.
  • Now take the strand and wrap it around four fingers, about 10 – 20 times, depending on how thick you want the skein to be.
  • Pull the loops off your fingers, keeping them in an oval, and pinch one end with your thumb and forefinger.
  • Put a toothpick inside the other endloop, and twist the whole thing about 7 times until it feels tight, but not too tight.
  • Fold the twisted skein in half – it will start to twist back on itself – and put the endloop you had pinched over the toothpick, on top of the other endloop.
  • The trickiest part is pulling the bottom endloop up and over the top endloop, which is why you don’t want to twist it too tight.
  • Now remove the toothpick, and as you do, pull the bottom endloop completely through the top one. This is what holds the hank together.
  • Voila! An adorable yarn hank. Then I just made about 50 more of them:-)

UPDATE: I’ve created my very first YouTube video of my process for making miniature yarn hanks. Check it out here: Miniature 1:12 Scale Yarn Hank Tutorial.

The only items that aren’t handmade, are the miniature spinning wheel, the clock (which is the face of a really cool wristwatch, and I fashioned a wire stand on the back), and the tiny coffee mug, donuts and croissant on the coffee table, which I bought from another artisan.

Knitting on tiny needles made from toothpicks is quite a challenge.

I do have some pictures of making the chair, but I think I will save that for a separate post. If you like what you see or have any questions on how I made something, please leave a comment, and I will try to review it in a timely manner – but make no promises;-) I would however, love to see some actual legitimate comments on my posts, as opposed to the endless stream of spam nonsense comments that I continually have to delete. Really, what is that about anyway? Is there some big money to be made by posting gobbledy-gook comments on blog posts?? But, I digress… I hope you enjoyed seeing my minature yarn shop roombox.

If you are interested in seeing my handmade miniatures that I have for sale, please visit my Thumbwick Miniatures Etsy shop.

Thanks for reading!

Margie

Dollhouse Tin Ceiling Tutorial – Made from Items Found at Dollar Tree

This tutorial will detail how to create a tin ceiling in your dollhouse from materials you can find at your local Dollar Tree store. I love shopping there, because everything is just $1, so it makes me feel rich😊 If you don’t have a local Dollar Tree (this store used to be called Everything’s a Dollar, but the name changed a while back), you may have a similar type dollar store, and chances are they have similar items, so check it out.

One thing you may need for this project, which you can’t find at your local dollar store is E6000 glue or 527 multi-purpose cement, which I recommend for certain steps. However, you will still have to tape things in place while they dry, so regular white glue or craft tacky glue will work too. I also used 15 mm silver three flower leaf bead cap jewelry findings for the ceiling light medallion which are not from the Dollar Tree. I found these on an Etsy site (https://www.etsy.com/listing/565810655/15mm-antiqued-bronzegolddull-silverwhite) for even less than a dollar – wohoo!

I decided a long time ago that the kitchen of my Bellingham Farmhouse was going to have wood plank flooring and a tin ceiling. I originally tried to design my own tin ceiling tiles, and emboss the pattern into aluminum sheeting with a stylus. I didn’t end up liking how this looked in the end, so I tore it out. Then I found aluminum cookie sheets at the Dollar Tree, which had a cool pattern, and thought I should try making the ceiling out of those. On a recent vacation from work, I put together a tutorial of the process. Following, are the steps I took to achieve the result in the photo above.

Tools needed:

  • Old scissors for cutting the aluminum (NOT your good sewing shears)
  • Work gloves
  • Ruler/straight edge
  •  Wooden craft stick, stir stick or any stick of desired width for the trim
  • Size 3/8” and 3/4” circle punches, or size needed to fit (optional for ceiling light medallion)
  • Pencil

Materials needed:

  •  Dollar Tree aluminum cookie sheets (pack of 2)
  • Dollar Tree craft glue, regular or tacky or white glue
  • E6000 glue or 527 multi-purpose cement (optional)
  • 15 mm silver three leaf bead caps (optional)
  • Scratch paper
  • Cellophane tape and masking tape (you can also get these at the Dollar Tree)

Steps:

First you need to assess the ceiling area that you want to cover. Does it already have a light, or will a ceiling light be added?


In my case, I already had a light wired, and that wiring was underneath the glass bathroom floor tiles above, which had already been glued down. Bad planning on my part. I decided to work around the light, rather than tear up the bathroom flooring. I measured the ceiling, and made a paper template of it, including marking out where the light fixture was. Because of the light fixture situation, I chose a layout of 4” square ceiling tiles – so I could cut out a little slot to slide one tile around the light fixture wire.

Then I started cutting out 4” by 4” squares from the cookie sheets. This aluminum sheet gets very sharp when it is cut, so it is best to wear a pair of work gloves while cutting and handling it. Unless you prefer to bleed on your project and have bandages on all your fingers
 It is very important to keep the pattern in mind. One side is a little shinier that the other. I chose to put that side out, and the duller side towards the ceiling. Cut carefully between the smooth and patterned sections of the aluminum sheet. You can use these smooth sections of the aluminum to make trim pieces. You will also use the pattern around the perimeter to make your coving pieces, so try not to damage that either.

Your pieces will need to fit together, so that the pattern lines up. Start to arrange them on your template. Pay very close attention to the bumps and ridges in your pattern so that one piece doesn’t get turned sideways. It may not be very apparent now, but it will be after you install it, so double check everything. You should have enough metal to cut new pieces if you make a mistake. Remember that you will need to lay your pieces face down on the template, so that they will be correct when you glue them to the ceiling. If you lay the pieces face up, they will be backwards, and if you cut around walls, or light fixtures, those holes will be in the wrong position when you try to install the ceiling. Notice the small notch cut out in the top left side of the center tile, in the photo below. That is for the light fixture wire.

I used cellophane tape to lightly tape the pieces together. I taped the front row together, but not the back rows to the front. This is so I could install the back part of the ceiling first, and then slide the front row around the light, as I installed it. If I made the whole ceiling as one sheet, I would not be able to do this. I used the template as a guide to determine where to cut around the walls.

I laid the back portion inside the room, facing down. This is how it will be when installed, with the “right” side facing down. I applied craft glue to the whole surface, and allowed it to become tacky (about 10 minutes). Then I installed the whole sheet on the ceiling, pressing it in place, and holding it with pieces of masking tape.


Then I tried to patiently wait for that panel to dry before installing the front panel. I am not very good at patiently waiting. I took a trip to the Dollar Tree to avoid the temptation of trying to glue the next panel too soon. I found some Reindeer Moss, which I love to use in miniature dried floral arrangements. It has such a nice earthy aroma, and interesting branching. They don’t usually have that in stock, so I got three bags. I also picked up some floral moss that looked like it might be good for making HO scale model railroad trees and shrubs. My husband has a very large layout that he works on all the time. When I showed him the floral moss, he loved it.

I installed the front panel the same as the back one, sliding the notch around the light fixture wire. Then I taped that into place to dry. While that dried, I prepared the coving and trim pieces.

I measured out each run of wall to see how long of trim pieces I needed, and wrote them on a piece of scratch paper. In the photo, you can see that I did not make the coving pieces a little longer than I needed them, and ended up having to make a couple more. When you measure the length you will need for each piece of coving, add a full extra inch. You will need this so you can cut the ends at an angle to meet nicely at the corners. Originally I prepared enough trim pieces needed to cover each seam between each 4” square of ceiling tile, but once I had the ceiling in place, I didn’t think that trim was needed, and thought it would detract from the overall look. I ended up just using the coving pieces and trim for the perimeter.


To make the trim pieces, I wrapped strips of flat aluminum around a piece of 12” long wood trim that was 1/8” wide by 1/16” thick. Again, it’s best to wear gloves for this. Then I slid the wood piece out, and with the rounded back of a spoon, I flattened out the edges. Now the trim pieces don’t have sharp edges. It’s a little tricky to keep these a uniform width, but using the wood piece as a guide is very helpful. I only needed one long trim piece for the front edge of my room, and a shorter one for the back archway between the kitchen and dining room, where the kitchen ceiling ends and dining room ceiling begins, to give it a finished look.

To make the coving that will angle between the wall and ceiling, I cut around the edge pattern of the cookie sheet, trying to leave about Œ” of smooth aluminum to the side of each long edge. Then I folded about 1/8” of the edges in, so they wouldn’t be sharp. I made as long of strips as I could, so I could cut the lengths I needed later. I chose the pattern bumps to face out, but you could do it the other way, depending on how you want it to look. Either way you choose, remember to be consistent. If the bumps will face out, then fold the edges away from the bumps. Run the edge of the back of your spoon along the edges to flatten them. Be careful not to flatten out your pattern bumps in the process. Now slightly bend the long edges in a curve, so your coving will have a slight ‘C’ shape against the point where wall meets ceiling. This is hard to explain, so I hope the pictures will help.

I glued the trim pieces and taped them in place with E6000 Glue. Then I held each piece of coving in place to determine the angle to cut the ends, so they would meet cleanly against the other pieces at the corners. I eyeballed this up, but I suppose there is an exact mathematical angle degree you can cut them at, I just don’t know what that would be. Notice how outside corner have to be cut at angles the opposite way that inside corners do. Again, I hope the pictures will help to explain this. I glued and taped the coving in place and let it all dry.

Then I punched out a circular form for the medallion to cover the ceiling light. I first punched out a 3/8” circle from a piece of smooth metal. I used another piece of aluminum sheet that I had on hand, but you can cut it from the corner of the cookie sheet. This is where you will find a big enough piece to work with. Then I eyed up the punched hole in the center of the 3/4” punch, to punch a larger circle around it.

I flattened three 15 mm silver three leaf bead caps with my fingers, which is easy to do, as they are very pliable. Then I broke off each leaf from them, by bending them until they snapped off, and glued seven of them in a circle pattern to the metal circle that I just punched out. You could probably improve on this design, by making your metal circle larger and adding more leaves to make it more intricate.


When all that was dry, I bent the whole thing into a slight bowl shape, and cut a slit in the medallion, so I could slip it around the light base. I glued it in place with E6000 glue and held it with masking tape overnight until dry.

When everything is finally dry, you can remove all the masking tape, and your ceiling is done.

I am thinking about using some of the leftover cookie sheet metal to make a tin backsplash to go above my counters in the kitchen. If I do, I will try to add pictures of it and my completed kitchen to my blog later.

I hope you enjoyed this tutorial. Please visit my Etsy shop, if you want to see more of my handmade dollhouse miniatures. I also sell some craft and miniature making supplies, and am adding new things all the time.

Happy miniature making!

-Margie
Miniature Dollhouse Potted Herb Plants in Wooden Crate Tutorial

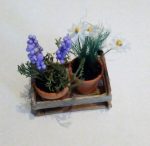
This tutorial will tell you how you can make a 1:12 scale miniature pair of potted rosemary and chamomile plants in a wooden crate, like the one pictured here. I apologize in advance, because my pictures are not great. I know that, and I’m trying to improve, but tiny items are difficult to photograph clearly. Please remember that this is not a tutorial on taking great pictures. It most definitely is not.

Here is a list of things you will need:
– Polystyrene foam microbeads – smallest you can find like around 1 mm in diameter works best (like the kind used in floam). I found some on Etsy.
– Green jute twine (or natural color and you can paint it green). I found this at Dollar Tree.
– Green embroidery floss
– Reindeer moss (I found this at Dollar Tree too)
– White glue (like Elmers)
– Sawdust (I got some off my husband’s workroom floor)
– White tissue paper
– Approximately 1/4″ mini flower punch (I used the Mini Daisy punch by Punch Bunch)
– Acrylic craft paints in purple, yellow, black and brown
– Paper cups and plates
– Needle or straight pin
– Floral foam (optional)
– 5 1/2″ wood coffee stirrers with flat ends, not rounded, or you can cut the ends off flat (I got 1,000 of these on Amazon)
– Miniature pots (buy these or try to make your own if you are feeling extra crafty – here’s a tutorial to make cute ones out of paper – http://1inchminisbykris.blogspot.com/2010/04/paper-pottery.html). I also have the mini terracotta pots pictured available on my Etsy site.

To make the soil:
Put about 1/8 – 1/4 cup of sawdust in a small paper cup. Add a couple drops of black and brown paint and mix it thoroughly with a coffee stirrer or other wooden stick. You don’t want to make it too saturated, just color it all a nice dirt color. Then spread it out on a paper plate to dry.

To make the rosemary flowers:
Put a small handful of foam microbeads in a paper cup. Add a couple drops of purple paint and mix it thoroughly with a wooden stick. When all the beads are colored, spread them out on a paper plate to dry. While they dry, occasionally stir them so they don’t all clump together. These will be your flower buds.

Separate the strands of a 2″ piece of green embroidery floss. With your fingers, coat each strand with white glue and lay to dry on a piece of wax paper. Wipe your fingers frequently to they don’t stick to your fingers. Move them around so they don’t stick in place while they dry. They should end up kind of stiff, but not “globby” at all. These are your flower stems.

Coat about 1/4″ of the end of each flower stem with white glue. Then roll it around in the purple painted foam beads. Lay these aside to dry, or you can poke a hole with a pin in floral foam and stand them up to dry. Make several of these. When dry shake off any loose beads.

Pick through the reindeer moss to find the best pieces that are kind of sprawly and bushy – don’t know how to describe this, but look for the pieces that look most like rosemary foliage. Get about 3 or 4 good ones for each plant you want to make. Trim your flowers (3 look nice) to the desired height and add to the middle of the moss. Glue the whole bunch together at the base with white glue, squeezing together with your fingers. Let dry.

Thin some white glue with water to work with it easier. Smear the inside of your clay pot with the diluted white glue and fill with your newly made soil. Shake out the soil that doesn’t stick in the pot. Put another small glob of glue in the bottom of the pot and glue your flowers and foliage bunch in the middle. Put some more dabs of glue strategically around the arrangement, packing in soil up to the top of the pot. Let this dry.

To make the chamomile flowers:
Put about a dozen or so foam microbeads in a paper cup. You only need one for the center of each flower, so you don’t need many. Color them yellow and dry them in the same process you used above for the rosemary flowers.

Fold your tissue paper 3 layers thick and punch out daisy flowers. Poke a hole in the center of the 3 layer flower with a straight pin. Using the same stems you made above for the other flowers, push the stem barely through the hole in one flower, and secure in place with a dab of white glue. Moisten your finger and pick up just one yellow foam bead and press it onto the dab of glue in the center of your flower on the stem. Lay this aside or stick in floral foam to dry. Make several of these too.

For the chamomile foliage cut a 1 1/4″ piece of green jute twine. Hold the very end and separate and fray the rest of the length of twine, until you have a nice grassy looking clump. Make a few of these for each plant.

Use the same process above to make bunches of foliage and flowers and arrange them in the pot with soil.

To make the wooden crate:

Your dimensions may be different, depending on the size of the pots you use, so adjust accordingly. I pre-aged my wooden coffee stir sticks to give my crates a rustic look, but this is optional. Here are a couple nice tutorials on aging wood using the vinegar & steel wool method, but there are dozens out there if you look: https://www.lilblueboo.com/2014/04/how-to-antique-and-age-wood-instantly-for-a-weathered-look.html Or https://www.thenavagepatch.com/aging-wood-vinegar-steel-wool.

I have found it to be true that the older your vinegar/steel wool solution is, the darker your wood will be. The wood in my crates was treated with a solution aged 24 hours, and painted with black tea before the vinegar solution. It turned a lovely light grey. I tried the same method with the same solution 2 weeks later, and the wood turned a very dark brown.

From your wooden coffee stir sticks, cut 5 pieces 1 1/2″ long, and 4 pieces 7/8″ long. These cut really easily with a pair of scissors, but the end always goes flying off somewhere, and you need to go find it. I’ve lost many pieces in my carpet, which I find later with the vacuum cleaner. So, maybe try to cut them over a box or something.

Lay 3 of the longer pieces flat, horizontally, evenly spaced out to cover 7/8″ wide. Take two of the shorter pieces, and place them at either of the short ends, perpendicular to the bottom pieces, on top of the very ends of the bottom pieces. Glue them upright vertically in place with white glue, or if you have wood glue, use that, as it will work even better. Hold them up by sandwiching the whole thing between two small boxes, leaning the vertical pieces just barely against the supports to keep them vertical while they dry. When dry, take two of the longer pieces and glue them vertically along the longer sides, on top of the ends of the two short pieces you just glued. You are staggering them as you build up the sides of the box. Follow the picture as a guide. This isn’t how a real crate is made, because a real crate would have a vertical pieces of wood at each corner that you nail the horizontal sides to, and supports framing the bottom of the crate, but since we are working in miniature, you can skip the corner supports, and it still holds together, and more importantly, looks cute. Now glue your last two shorter pieces vertically upright along the shorter sides, on top of the ends of the longer pieces you glued and let dry. So the shorter ends each have two slats, the longer ends have one slat and the bottom has three slats when finished. Feel free to improve on this design, as I’m sure you can. Square toothpicks might be good to use for corner supports, if you want to make your crates look more detailed and realistic. You could also make tiny dots at the corners with a marker to resemble nail heads.

When everything is dry, place your two pots of flowers in your crate. Step back and admire your creation with pride.

1/12 Scale Dollhouse Wood Plank Flooring

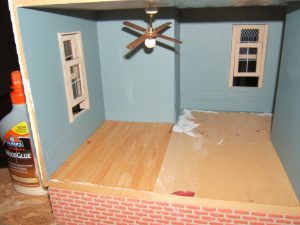
I’ve been installing wood flooring in my Bellingham farmhouse kitchen. I’ve been using 3/8 ” wide craft sticks, a.k.a. popsicle sticks, which are equivalent to 4.5″ wide planks in real life. That seems about right, although I really don’t know. Our own house, which was built around 1930 has wood flooring with 2.25″ wide planks, but that seems more modern to me than this dollhouse, which is an architectural style that is at least 40 years prior to that.

I started by sawing the ends of all the craft sticks off with a small Exacto miter box saw. This takes longer than you’d think. Then I made a paper template of the kitchen floor. Some of the sticks I kept at whole length and some I sawed in half. This caused the planks to be staggered. Then I laid them on the paper with double-sided tape. At the end of each row, I cut the last stick to the proper length. After I got a bunch of the pattern laid out, I stained the whole thing with Minwax stain and polyeurethane in oak color. It’s what I had, but if I did it again, I’d go darker. Maybe I will in the living room later.

When it was dry, I removed each stick from the paper, and glued it to the floor in the same layout. I used wood glue, but I think maybe rubber cement or hobetac would have been better, because then there would have been some flexibility as everything dried completely. You can see in the picture that a few boards warped a little when they dried. I guess it gives it a very rustic, realistic look.

Here is part of the finished floor:

Mini wood flooring Wood Plank Flooring

I think it’s turning out pretty well. Can’t wait to get it finished, so I can move all my kitchen cupboards back in. I spent way too much on this set, but I just had to have it. It is very realistic with doors that open. I just love that. I spray painted the fridge to look like stainless steel. It was wood when it came, and I thought: “Who has a wooden refrigerator?” That had to be fixed. I don’t really like the stovetop either, so I’ll probably change that up to make it look like a gas stovetop. My mini people have to cook with gas!

Dollhouse oak kitchen set

Before I can move everything back in, I have to finish the tin tile ceiling (post to come on that later), and get all the trim up.

Miniature BBQ grill in 1/12 scale

Hello fellow miniature enthusiasts:

This is my first official blog post.

*Disclaimer: If you happen to comment, please know that I am notoriously bad at checking email or voicemail, so don’t take it personally if I take many weeks to respond. Know that I do appreciate your participation though.

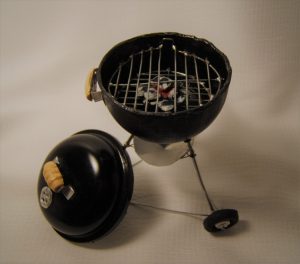
For several years now I’ve been planning in my mind to make a realistic Weber-style charcoal grill for my dollhouse. I can just see it sitting on the front porch with a tiny bag of charcoal briquettes next to it. It started when I got a 2″ plastic toy capsule from a vending machine. In my mind’s eye, I saw a mini BBQ grill right away. When I measured it, and then our own human-sized grill in the backyard, I was delighted to find that the scale was nearly perfect. Then the capsules sat in my closet for about 14 years. Fast forward to the summer of 2016.

The first challenge was removing the ridge from the bottom of the toy capsule. Otherwise the top and bottom of the grill would be snapped together, which I didn’t want. I wanted the top to be easily removed from the base. Since the capsule is rigid plastic, most attempts to cut it would result in cracking it. I ended up having a friend use a hot wire to cut through it. Possibly a very fine saw may work, but I didn’t try it. I may have to if I want to make another one, as I don’t want to invest in a hot wire. I also wonder if there aren’t other types of plastic capsules that would be a bit more flexible, and thereby easier to cut. This is another thing I want to research.

I know that you would like to see pictures of all the steps of my process, but unfortunately, I didn’t take pictures until the end. This is the best I can do with pictures, so I apologize, because am not great at taking pictures, although I am getting better.

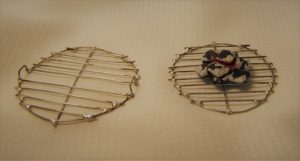
Mini BBQ Grill Mini BBQ GrillGrill Grates

As you can see from the picture of the grates, my soldering skills could use some improvement. Hey, did you know that not all metals can be soldered together? I do now. Bending the wire into the correct shape also proved tricky. I spray painted the toy capsule black, which took a few coats, but looked great when done. The top had some embossed letters in the plastic, which I removed with an emory board prior to painting.  I couldn’t find a suitable wooden disk for the wheels, so I made them out of polymer clay. I also made the charcoal out of clay. Then I glued the teeney briquettes together into a pile and used an artists brush to paint the edges white, and red in the center, to make them appear to be hot and glowing.

If I make another mini grill in the future, I will remember to take pictures of the process – promise!