
French style split arch wooden 1:12 scale door
I just have not found the time to do much with my Walmer dollhouse rebuild lately, but I did make some design decisions. I designed an impressive new front door to replace the mass-produced version I was going to use. I think it will give it more of a European flair. I used pictures of full-sized split arch French style doors to create a pattern. Then I had fellow Etsy seller ShedtoshelfBySean produce it for me. I really like how it turned out.

After some staining, gluing with clear plastic sandwiched between the doors for windowpanes, hinges, fancy door handles and a lot of cutting and sanding to make it fit, I finally got the door that I want. I plan to build a small overhang above the door to create a portico and make it more inviting.

I also practiced my stonework technique and decided on stone and mortar colors. The “stone” is made from torn pieces of paper egg carton. The pieces I used for practice are larger than what I will use on the exterior walls of the dollhouse. I glued the pieces to a painted piece of cardboard. Then I tried various colors and techniques for the stone and mortar. I’ve decided to go with the one on the left in the picture below. It is a custom blended mortar color, FolkArt chalk paint in the shade of Sheepskin (ugh, I don’t like the name) with a very watered-down wash of Rust-oleum Chalked Smoked Glaze. The stones next to them have a wash of Chalked Aged Glaze, but I like the gray look of the smoked better. I will finish with a sealer, but I haven’t decided between Mod Podge matte or a matte artist spray sealer yet. I’ll have to do a test to see which looks better.

I will be much more careful with the mortar color when I do the finished product, I was just being sloppy with my test because I got tired of trying different colors.
The other decision I made was to use split cedar shakes for the roof. I’ve been hemming and hawing over that because I wanted to do a metal roof, but I just don’t have any experience with that and am not confident that it would turn out well. I’d rather go with an “aged” wood shingle look, because I have worked with that before. I wasn’t really sure if cedar shakes are usually done on a mansard roof, but I found out it is fairly common. I found this picture, which is most likely the look I would get, except I could apply a grey wash to age it:

Then I saw THIS, and it really makes me want to go with the fish scale shingles. It also makes me want to add the extra ridge at the bottom so that I can add corbels. And this is why my project is taking so long…

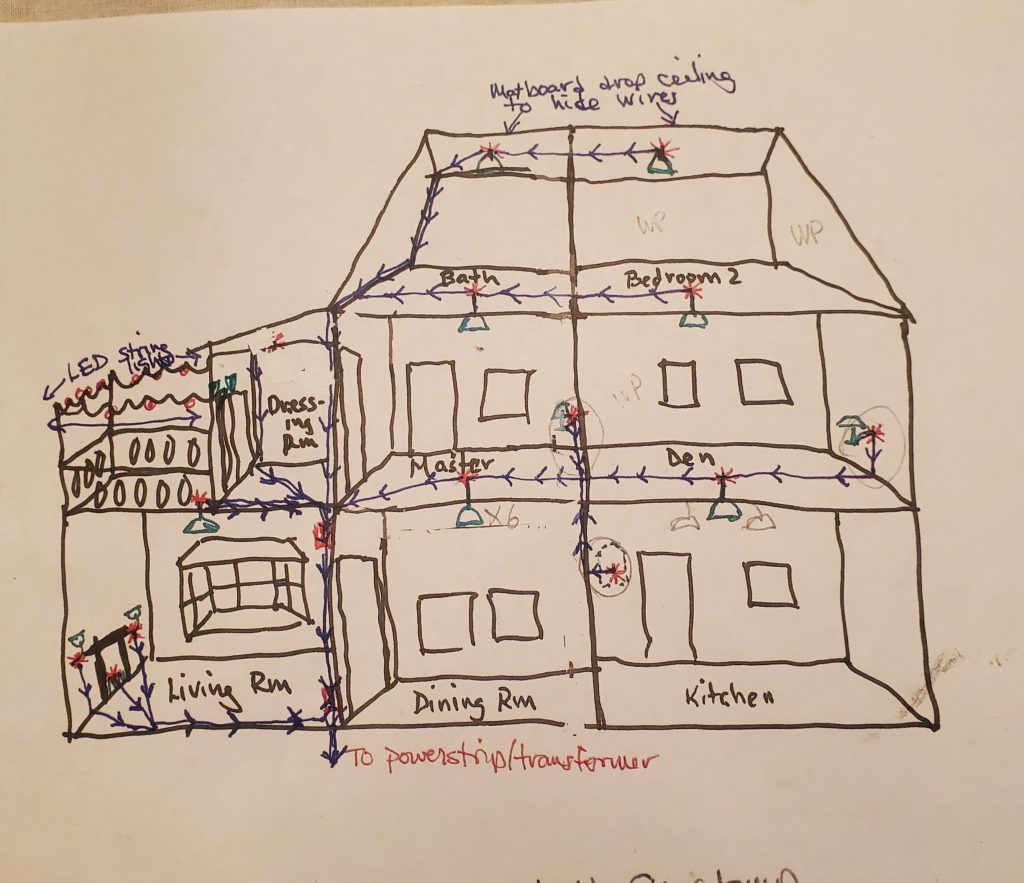
I really have to get busy with wiring, because it is holding up a lot of other processes. Below is my crazy wiring diagram, if you are interested. You can tell that I don’t have any hidden drawing talent. It probably only makes sense to me, because there is so much going on. The left addition will be wired separately from the right so the house can come apart. I want to make most of the light fixtures by hand. The red asterisks indicate where light fixtures will be. Most of the wires will be hidden by flooring or trim. I don’t want to use tape wire and with 3V LEDs I don’t have to. The wires needed are a very fine gauge so should be easy to hide.
More to come, but I can’t really promise soon – unless I win the lottery or something.
Take care! – Margie